| Welcome, Guest |
You have to register before you can post on our site.
|
| Forum Statistics |
» Members: 53,731
» Latest member: jdhgmail2
» Forum threads: 68,302
» Forum posts: 1,057,328
Full Statistics
|
| Online Users |
There are currently 473 online users.
» 2 Member(s) | 469 Guest(s)
Bing, Google, lincmercguy, Tapper
|
|
|
| A Tool Tray and its dovetails |
|
Posted by: Derek Cohen - 07-12-2025, 08:23 AM - Forum: Woodworking Hand Tools
- Replies (6)
|
 |
A week ago my wife asked to build a tea tray. Something on the smaller side. At the same time, I agreed to do a dovetailing demonstration for my woodworking club. So I was thinking about construction of the tea tray, and whether it was possible to kill two birds with one stone, that is, was there a place for the tea tray in the demonstration?
I am not sure why it is, but few of the furniture/case or box builds I see on YouTube or websites feature mitred dovetails. It is usually only simple through dovetails or half blind dovetails. Using half blind dovetails at the front of a drawer is obvious, as is the simple through dovetail for the drawer back. Ploughing a groove for the drawer bottom (if not using slips) is straight forward here since the groove is hidden inside the half blind front.
But this is so with cases and boxes utilising through dovetails. Without a mitre to hide the groove inside, one must use a stopped groove, and this is cumbersome to make with hand tools. Not to mention the fact that mitred ends look better than stumpy square ends. I routinely use mitred through dovetails. They are more work, in fact, I think they require a lot more care when sawing. But, like everything, it gets easier with practice.
Now the great majority of the members of the woodworking club are power tool users, and I was asked to come along to provide a variation for the other presenter, who will focus on finger joints. Finger joints are pretty strong, but only because they create a large glue area. Dovetails, being a mechanical joint, do not need glue (if done well). I thought I might demonstrate this by taking along a dovetailed tea tray, and not glue it up. Might be interesting to pass the tray around for inspection ... and then knock it apart in front of all! ![[Image: 1f642.png]](https://cdn.jsdelivr.net/joypixels/assets/8.0/png/unicode/64/1f642.png)
The size of the tea tray is 500mm (about 19 1/2") in length and 380mm (15") in width. The wood is some Black Walnut scraps ... the very last I had. Such pretty wood, and possibly the best wood in the world to work with hand tools.
I am not going to bore anyone with pictures of dovetailing. There is a pictorial on my website, here. Instead, a few progress photos to illustrate how mitred through dovetails aid here.
Dovetails ...
![[Image: 4.jpg]](https://i.postimg.cc/sXVjtkcd/4.jpg)
Grooving the sides ...
![[Image: 3.jpg]](https://i.postimg.cc/7L1PtHSn/3.jpg)
Fitting together ...
![[Image: 5.jpg]](https://i.postimg.cc/C1mhYcPZ/5.jpg)
![[Image: 6.jpg]](https://i.postimg.cc/HnnpLbR6/6.jpg)
Four sides ...
![[Image: 2.jpg]](https://i.postimg.cc/PqHL6wsx/2.jpg)
![[Image: 1.jpg]](https://i.postimg.cc/FH3dgx68/1.jpg)
Rebating the tray bottom with a Veritas Skew Rabbet Plane. The bottom is 7mm thick and the rebates are 3mm wide and deep ...
![[Image: 7.jpg]](https://i.postimg.cc/fbTmSZYz/7.jpg)
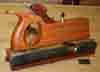
This is where a shoulder plane is best used ... to clean and tune rebates ...
![[Image: 8.jpg]](https://i.postimg.cc/zGNn5TBR/8.jpg)
The fit ...
![[Image: 9.jpg]](https://i.postimg.cc/6phCQT2b/9.jpg)
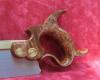
The next stage is for the ends to be shaped. In this photo a template is create to make a uniform curve ...
![[Image: 10.jpg]](https://i.postimg.cc/hPT9H2SB/10.jpg)
Cut out, smoothed, and then fretsawed out and finally finished with rasps and sand paper ...
![[Image: 11.jpg]](https://i.postimg.cc/kMVNynzD/11.jpg)
The underside ...
![[Image: 12.jpg]](https://i.postimg.cc/G3ZF7WnK/12.jpg)
The joinery is not glued but really solid. Very pleased with this. Some dusty mitred through dovetails ...
![[Image: 13.jpg]](https://i.postimg.cc/Rq5Z7181/13.jpg)
Job done with one coat of hard wax oil ...
![[Image: 14.jpg]](https://i.postimg.cc/8crCfXyP/14.jpg)
Regards from Perth
Derek
|

|
|
| Your dream router and table |
|
Posted by: Arlin Eastman - 07-11-2025, 02:06 PM - Forum: Woodworking Power Tools
- Replies (17)
|
 |
If you could have a dream router and table how would you like it or dream of it working with any attachments?
Me attachments would be something like clip on additions which were small or just big enough that attached to the fence or table itself to get the job done right. I would like a router raiser that has large numbers to read and settable to raise by 1/16 or 1/32 up and down with a big noise suppression where it will change the bits automatically changed to what is needed for the job.
I love attachments that show on a screen how it works or adjustable to how you want it to work or adjust itself to what you want to do or where it suggests ways you can use it to its potential. Or another think is you want a cabinet door and it suggests many different styles and or hinge selection and automatically does it with a board you just lock into place.
What do you guys want in a one.
|
|
|
|
| 2004-2007 Sawstop CB Saw upgrade deal |
|
Posted by: BloomingtonMike - 07-09-2025, 05:14 PM - Forum: Woodworking Power Tools
- Replies (8)
|
 |
This will most likely only affect the buyers of the early Professional Cabinet saw in the 2004-2007 range or so.
Making sure you early adopters of the sawstop saw read that they are offering a deal on the upgrade to the latest brakes they use.
Here is the link to the 5hp upgrade: https://www.sawstopstore.com/product/cb-ics-51230/
3hp version is https://www.sawstopstore.com/product/cb-ics-31230/
This move will help keep the brake technologies more readily accessible.
Its a decent job of upgrading the saw so be advised what it entails.
They also are offering previous cb customers a 10% off to buy a new saw!
My next full saw will be that crazy Felder with their hand sense technology but that costs like a truck so for now $388 plus tax and shipping to upgrade my SS is my solution.
Mikie
|
|
|
|
| WTB 3520B mobile base |
|
Posted by: RonB1957 - 07-09-2025, 09:38 AM - Forum: Tool Swap N' Sell
- Replies (13)
|
 |
I am looking for that mobile base they used to make for the Powermatic 3520B. It seems the person who owned the patent retired and it is no longer made.
I know it is a long shot, but IF you know of one somewhere out in the wild, please let me know.
Thank you.
|
|
|
|
| Exterior Trim |
|
Posted by: Cub_Cadet_GT - 07-08-2025, 03:56 PM - Forum: Home Improvement
- Replies (8)
|
|
I have to replace some small pieces of exterior trim around some of the glass in my sunroom that has rotten out from weather/rain exposure. It's a weird thickness ~.56" and I cannot find any pressure treated stock in that thickness.
I downsized several years ago and got rid of my thickness planer and don't want to drop several hundred just for this project. I was able to find some white pine shiplap that was the right thickness and I can mill all the rest of the edge details with my router table.
My question is other than good caulk and exterior paint what could I use to help protect it since it is not treated? Should I coat in epoxy before installation?
|
|
|
|
| Laguna Tools Customer Servcie - Kudos |
|
Posted by: jcousins2 - 07-08-2025, 02:40 PM - Forum: Woodworking Power Tools
- Replies (5)
|
|
I have been using resaw king blades for several years – 1” carbide run on a mm16 – strictly for cutting veneers. Have always kept a backup previously sharpened blade on the wall for the time when “good” blade dulls. That backup blade was sharpened in July, 2024 – it’ been waiting since then. Well, the “good” blade did get dull – so I took the backup sharpened blade down – removed the plastic sheathing, and installed it. It cut terrible – really loud, vibrating, and lots of lurching. Checked the weld and gullets for cracks – all looked fine. Then I reset everything just to make sure – and same thing. I called Laguna and told them my tale. They opened up a case – followed up and asked for some verification – pics of the welds and video of cutting. After reviewing things they totally made good on the blade. Here’s to laguna tools - props when props are due.
In the past I have had other blades sharpened which worked just fine.
jc
|
|
|
|
|


