| Welcome, Guest |
You have to register before you can post on our site.
|
| Forum Statistics |
» Members: 53,692
» Latest member: gcallistro
» Forum threads: 67,901
» Forum posts: 1,051,735
Full Statistics
|
|
|
| No65 Knuckle back block plane bodies? |
|
Posted by: Blacky's Boy - 05-10-2025, 07:13 PM - Forum: Woodworking Hand Tools
- Replies (3)
|
 |
A couple weeks ago I attended the CRAFTS of NJ tool auction and won a couple of lots of block planes. The ones I won contained some Stanley knuckle back block planes. A type I've always been intrigued by. I'm not sure if it was because I was rushing to look over the tools before the auction or I just plain forgot, I never looked at the mouths of either of the knuckle back block planes. And yep, both were toast. They were chipped and broken beyond repair. So here I am, stuck with a bunch of parts for block planes I can't use. Does anyone have a body for the No65 they'd be willing to sell? It would have to include the mouth piece since these seem to be fit to each plane. I had parts from several and they didn't fit in each other's body. I contacted Michael Jenks at JustPlaneFun and he was fresh out. He sent me a No65 body that had hairline crack near the mouth just to mess with. But when I went to flatten the sole, the mouth chipped out even more.
The good news is that I got some other cool block planes from the lot. One was an Ohio Tools double ended block plane. Not a great performer but cool looking as hell! There was a couple pristine Stanley No 9 1/4 block planes, a Stanley 102 as well as a Sargent knuckle back block plane. It has a very cool mouth opening mechanism and seems like it's built very stout. (Can't wait to clean up that one and give it a try).
So if you have a Stanley No65 you'd be willing to part with or part out, let me know
Please don't PM me. I never get notifications and it's easy for a PM to get lost. Email me at DominicGreco@netscape.net
|

|
|
| WTB: Yankee 1003 drill press (or replacement table only) |
|
Posted by: JoshS - 05-10-2025, 10:24 AM - Forum: Tool Swap N' Sell
- Replies (2)
|
 |
Hoping to find a replacement for the adjustable height table that goes with the North Brothers Yankee 1003 hand crank drill press.
Looking for the whole table setup that includes the work table that inserts into a cast fitting, with a threaded rod and handwheel that raises and lowers the table.
Located in SF Bay area but happy to pay shipping.
If you have a complete Yankee 1003 drill press you want to sell instead of parts, let me know that too!
|

|
|
| Sandblasting gun |
|
Posted by: DogwoodTales - 05-10-2025, 07:19 AM - Forum: Woodworking Power Tools
- Replies (10)
|
 |
Just fishing for recommendations on sandblasting kits.
I have an air compressor, so do I really need a full kit with a tank?
I don’t have a lot to do so don’t want to break the bank on this, but also don’t want to go too cheap on this and sacrifice too much performance and time either.
First job on the list is to sandblast years and layers of paint off the rod iron on my front porch. That might require some basic paint stripper first.
Anyway, thanks for the recommendations.
|

|
|
| Bosch 1617EVSPK Router |
|
Posted by: doobes - 05-07-2025, 02:49 PM - Forum: Woodworking Power Tools
- Replies (4)
|
 |
So,
I've had this router for a fairly long time.
It survived being flooded in Hurricane Katrina.
I went to use it the other day, and it started sparking, and emitted an odor indicating release of the magic blue smoke was imminent. So it was immediately shut down.
Taking it apart, the commutator was pretty dirty and the brushes looked pretty nasty. So I replaced the brushes and cleaned the commutator off with an abrasive pad.
It's better now, but still not right.
I think it's the speed control, but I don't like throwing parts at problems.
Can this router be wired to bypass the speed control?
Thanks in advance
|

|
|
| Dewalt GA Refurb and Mod (Pic Heavy) |
|
Posted by: Tapper - 05-04-2025, 08:15 PM - Forum: Woodworking Power Tools
- Replies (19)
|
 |
Hello All,
I've always wanted a Dewalt medium arm radial saw ever since I sold my old Craftsman many years ago. I found this Dewalt RAS on Ebay some time ago. It sat in my garage for at least a couple years, in the queue behind other projects.
The Saw
Dewalt GA, medium arm (24" crosscut), 3 HP, 3 phase. Serial # says it was born in 1958. When it arrived it looked to be in "decent" shape for its age. Had been used in a commercial shop for some time. My only concern was the condition of the ways. Seller had told me on the phone that when he pulled the carriage there was no "bump." He was truthful, fortunately for me.
Below are a couple of photos of the saw as it looked when it arrived. Table was trashed and someone had used a nail to substitute for the tapered pin that secured the elevation handle. All the parts were there as far as I could tell. My plan was to disassemble the saw entirely, clean everything thoroughly, replace worn parts as necessary, and reassemble. Saw was completely disassembled, all rollerhead bearings were replaced as well as the motor bearings. All parts were cleaned thoroughly before reassembly.
I decided to do a refurbishment and not a restoration. The painted parts were cleaned and three coats of wax applied for protection. No painting was done.
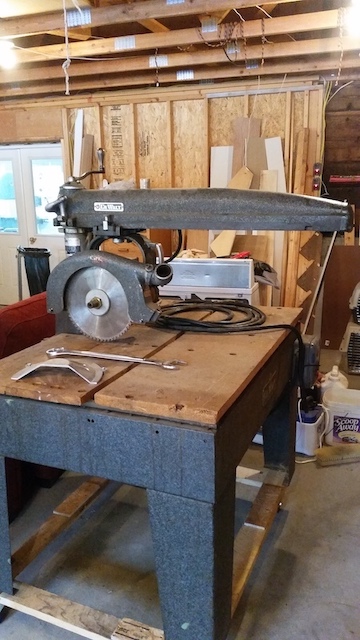
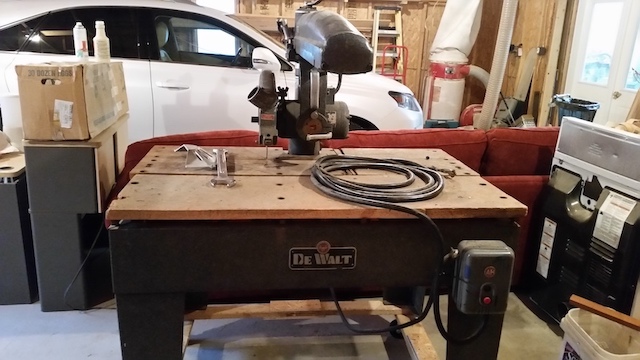
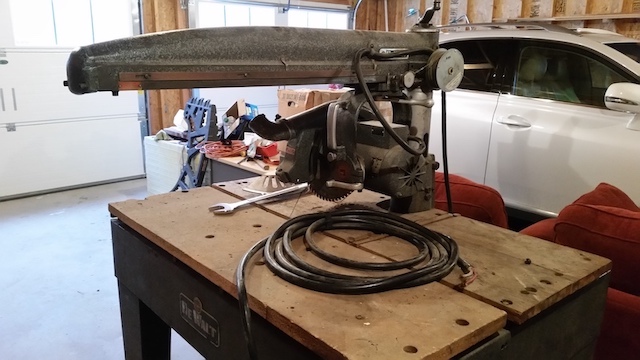
The Elevation Motor
As the saw sat, I was surfing Ebay one day looking for something else and ran across this previously owned DC motor for sale on a "Buy It Now." Got me to thinking about the possibility of a motorized elevation device.
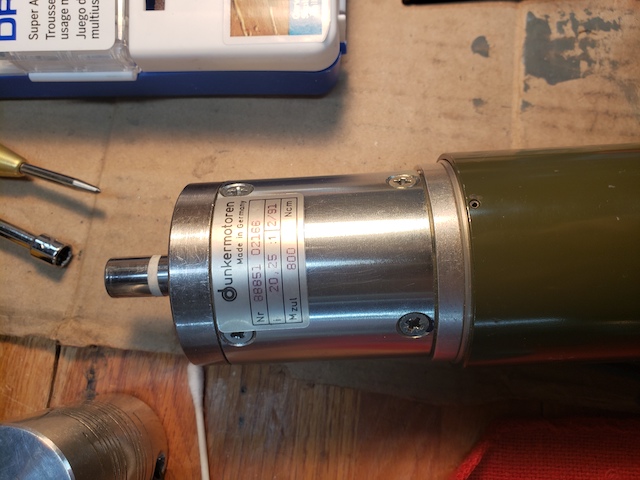
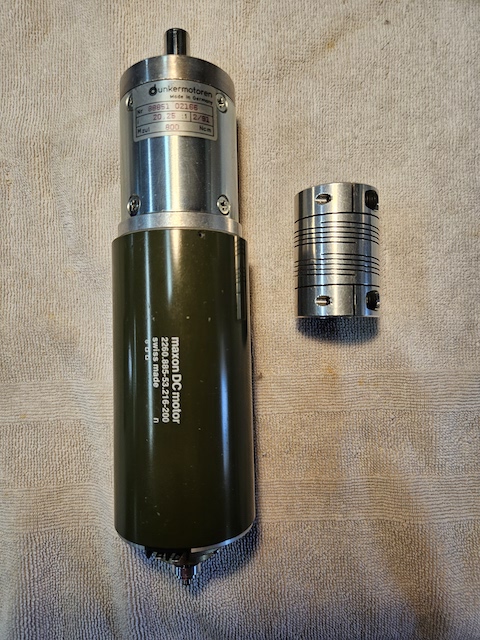
This is a Swiss motor with a German drive. I consulted with a good friend who has a technical background. The question was would the motor be strong enough to lift the arm, the motor and carriage, and if the gear ratio was in the right range. He did some research online and thought it would work, so I decided to make the purchase. I found the coupling at McMaster Carr, and felt lucky since the shaft on the motor is in millimeters and the shaft on the saw is SAE.
The Housing
The question now was how to connect the motor to the saw? Obviously a housing had to be made. This sent me off on another journey - machinery for a home machine shop. While I won't go into excruciating detail, I purchased a South Bend Heavy 10 lathe (in another state - long road trip) and a Bridgeport milling machine, found locally. Also picked up an old Peerless Power Hacksaw on the cheap. My father was a machinist by training and trade but I never learned the skill because we didn't have any machines at home. So, I was into another learning curve. First thing to do was to come up with a plan for the housing. Below is the sketch I drew up, along with a puzzle I made to make sure the parts would fit together as planned and connect properly to the motor.
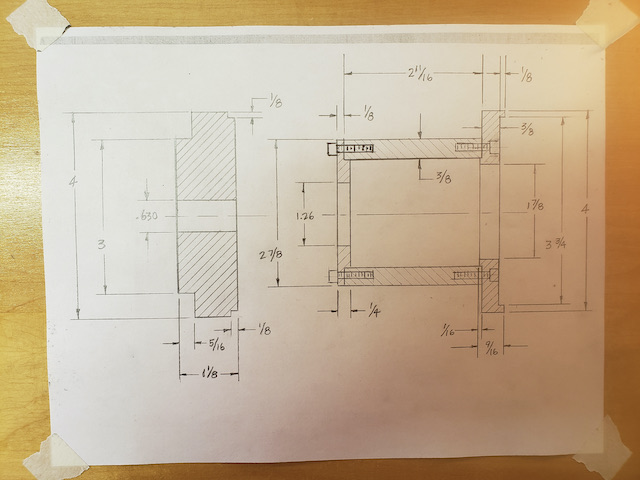
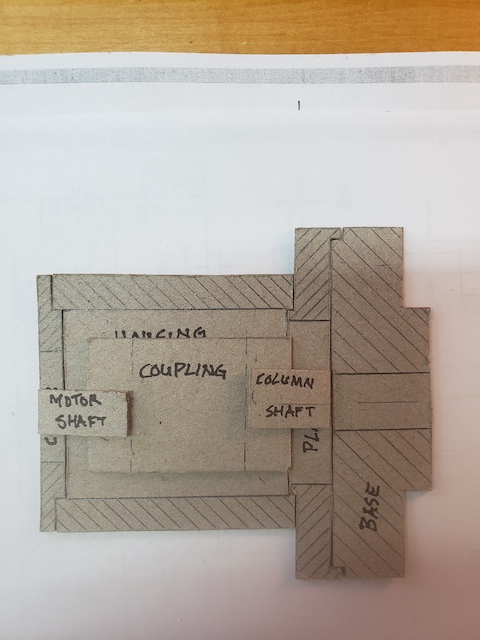
At this point I knew the motor would spin in both directions as I had it tested at a local electronics shop. So I set about making these parts. I had inherited some tooling from my dad so I began with it. As I went along, with help from folks at the Old Metalworking web site and Practical Machinist, along with YouTube, I was able to move forward and learn some basic skills.
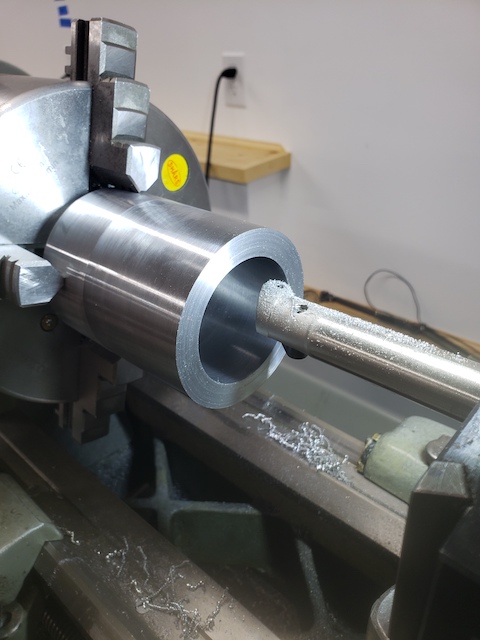
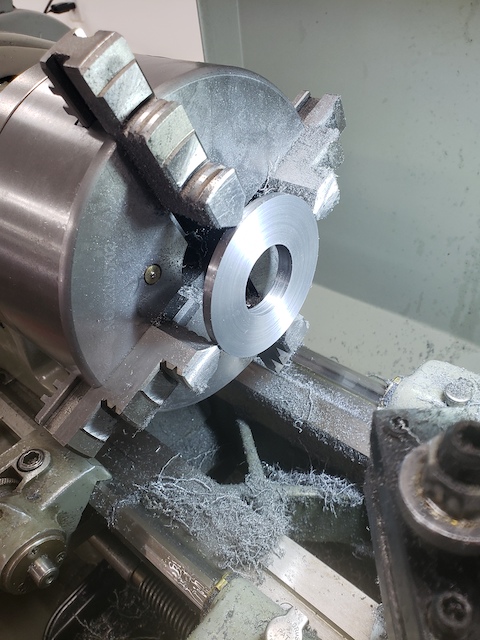
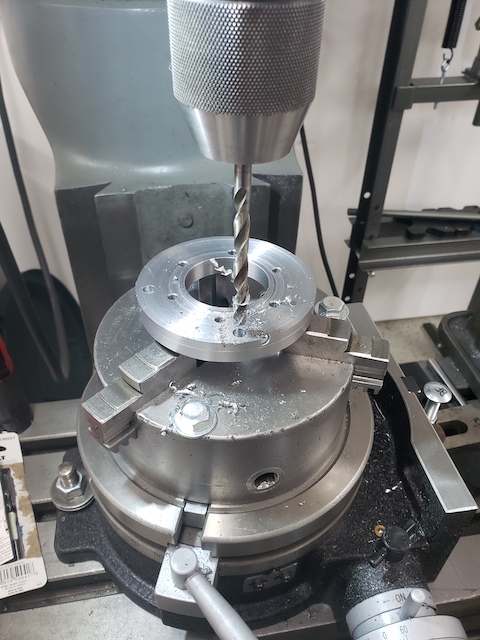
(To be continued...... Maxed out on photos)
Doug
|

|
|
| More Cheating |
|
Posted by: jteneyck - 05-04-2025, 09:43 AM - Forum: Woodworking
- Replies (12)
|
 |
A friend is just starting the build of a Thorsen sideboard, shown in FWW 125, 126, and 127. It's quite a project. The author used classic drawer and guide/glide construction, but my friend is planning to use Blum undermounts. The author makes it pretty hard to ferret out the dimensions of all the parts, but my friend and I managed to figure it all out, and I drew it up in SketchUp for him.
![[Image: AP1GczOHp_g0H75b0sYUTG97_rq1HIEjWfuUDEd9...authuser=1]](https://lh3.googleusercontent.com/pw/AP1GczOHp_g0H75b0sYUTG97_rq1HIEjWfuUDEd9WnGP6Fuvk43NzvANWtSLHpjzOlgSfZQZm9vGrfIoM8k9faOxcVGDOiaKM4Sf2wFjx6JJM3dC2EaPnYX2gAxx7B_zhQWVyBx0LRyQVNWxq1Pws0K3xmG8_Q=w1460-h604-s-no?authuser=1)
The darker color represents plum pudding mahogany, of which he has a single large plank. Some will be cut into veneer, and some will be the parts that have to solid, like the breadboard ends of the top and doors. The lighter color is plain grained African mahogany.
The drawers have half blind dovetails to join the sides to the front. When I looked at them, I thought it would be a nice challenge to see if I can do them on my CNC. So yesterday I gave it a try with a generic design. Using the undermount slides adds another element to the joint. There needs to be a 5/16" rabbett on the back of the drawer front for the required clearance of the slides, when using 1/2" thick stock.
You can go about this a couple of ways on a CNC. If you want sharp corners then you use a DT bit. The problem with that is you are limited to the bits that are available, and not many can produce the look of a handcut one. If you can accept rounded corners then you can create any size and shape DT you want. I showed some through DT's I did on this little project a few months ago, from a project by Michael Pekovitch in FWW.
![[Image: AP1GczPb7TnMhemlcDJ6iqXOJRAOfRDBCMomLcnX...authuser=1]](https://lh3.googleusercontent.com/pw/AP1GczPb7TnMhemlcDJ6iqXOJRAOfRDBCMomLcnX-WpTrVN17pSlRUyCWA5K7OvdumUAF8oG-iAkH21gvjAM22r2PnEdrJtb8xYpQsYHz4A8a6S1JiXw-BFUeFJmBLvkEHk1I59lRn6_ktF2FSwgdWMpoBEsMQ=w1460-h821-s-no?authuser=1)
![[Image: AP1GczMDHNpGGOxiTujfuXFW0u7QPOf0vHVL70fu...authuser=1]](https://lh3.googleusercontent.com/pw/AP1GczMDHNpGGOxiTujfuXFW0u7QPOf0vHVL70fuULmxBWwGaI2kHQTL0Vb8B4aa7c9LhtvnH5h2j8tEnO6JZ83y_e-9J931jgekBiU_P2Kd9a7UdjDtrTCu-oPmVIFTD0JR7wAU6tAfx5ZModCshhc0wCKb7A=w1460-h821-s-no?authuser=1)
I was able to use a 1/16" bit in the corners of the tails, so the DT's are about as close as you can get to what Pekovitch did by hand. I had hoped to do the same with the drawers on the Thorsen cabinet, but the need for that rabbett complicates it because of how deep the cuts need to be to make the pins. A 5/16" deep rabbett plus a 1/2" drawer side means the bit has to be able to reach 13/16". That's no problem for a 1/8" bit but I don't have any 1/16" or similar sized bits that have that much reach. They may exist, however, so I'm still looking. But for this test I used a 1/8" bit, so the corners look machine made. There are a lot of mistakes in this, but it's still not bad for the first attempt. This isn't glued, just fit together.
![[Image: AP1GczPaXpg2j7gDBioL_HiO-vBTUq1B1WvNjioo...authuser=1]](https://lh3.googleusercontent.com/pw/AP1GczPaXpg2j7gDBioL_HiO-vBTUq1B1WvNjiooPTEkP89nmZCzAMKUZIrch-nTPFiuk2XNXXrUf6Gb8rsFx4gQ7K5ZpsWP8ANNH9WXv0CLjNJ0f67NJ4RPnhiPXz7m_U9V7nhuR9x-pFaE_ztLPdxzr4k9Sw=w1460-h821-s-no?authuser=1)
The V's are out of place, but easily fixed. They are inlays and represent my friend's last name. I forgot to round over the outside corners of the pins when I did the CNC drawing, so I did those by hand.
If I can't find a small diameter endmill to get really sharp corners then I may consider using a different shape altogether, like the dog bone type, or another that purposely has rounded corners.
John
|

|
|
|


