| Welcome, Guest |
You have to register before you can post on our site.
|
| Forum Statistics |
» Members: 53,733
» Latest member: Ferdster
» Forum threads: 68,332
» Forum posts: 1,057,708
Full Statistics
|
| Online Users |
There are currently 989 online users.
» 14 Member(s) | 973 Guest(s)
Google, Bing, Brian in sunny FL, greenacres2, tocws2002, Dumb_Polack, Bill Holt, JosephP, Sean®, Ricky, Clay Kessler
|
| Latest Threads |
Now it's the Generator
Forum: Home Improvement
Last Post: MstrCarpenter
8 hours ago
» Replies: 2
» Views: 83
|
Sliding Patio Door Doesn'...
Forum: Home Improvement
Last Post: crokett™
Yesterday, 07:12 PM
» Replies: 16
» Views: 870
|
Ceiling Lamp
Forum: Woodworking
Last Post: jteneyck
Yesterday, 07:08 PM
» Replies: 0
» Views: 71
|
Remembering and thanking ...
Forum: Woodworking
Last Post: MsNomer
Yesterday, 03:39 PM
» Replies: 7
» Views: 1,114
|
Fantasy Tool Box - Sharpe...
Forum: Woodworking Hand Tools
Last Post: Mike Brady
Yesterday, 02:03 PM
» Replies: 9
» Views: 306
|
Has anyone here tried tho...
Forum: Woodworking
Last Post: DogwoodTales
Yesterday, 01:49 PM
» Replies: 3
» Views: 180
|
Dumb shelf pin hole quest...
Forum: Woodworking
Last Post: DogwoodTales
Yesterday, 01:46 PM
» Replies: 3
» Views: 122
|
Laguna vs Dark Stone bs b...
Forum: Woodworking
Last Post: DogwoodTales
Yesterday, 01:41 PM
» Replies: 10
» Views: 554
|
missing instructions
Forum: Woodworking Hand Tools
Last Post: Ferdster
Yesterday, 01:19 PM
» Replies: 0
» Views: 79
|
That time again...
Forum: Woodworking Hand Tools
Last Post: bandit571
Yesterday, 12:44 PM
» Replies: 3
» Views: 243
|
|
|
| Attachment Question, Nails & Glue? |
|
Posted by: Scoony - 03-01-2025, 01:44 PM - Forum: Woodworking
- Replies (13)
|
 |
I am working on a dining table project. The table base is basically two ply boxes made from 3/4" maple ply with accent strips attached. The strips are 3/4 x 3/4 red oak.
The ply boxes have been painted with a flat black enamel. The accent strips have been dyed, stained , and coated with varnish. The face that will be against the ply box has dye only, no stain, and no finish. The strips will be mitered to wrap around the boxes.
The question is on attaching the strips to the boxes. I would like to use glue and nails.
Glue: I am not sure what glue would work given the painted surface, but it would have to be a product that does not leave much of a mess. I will be able to go back and touch up the paint between the strips, but I would like to avoid that as much as possible.
Nails: I have a 18 ga nailer and a 16 ga finish nailer. The concern with the finish nailer would be splitting the strips. I could also use just pain finish nails and hammer them in by hand using predrilled holes to prevent splitting. There is no option to screw the strips from behind. I also have a 23 ga pin nailer that I can use on the corners.
I am open to suggestions.
|

|
|
| Battery operated tools |
|
Posted by: tablesawtom - 03-01-2025, 01:07 PM - Forum: Woodworking Power Tools
- Replies (27)
|
 |
I am on the Makita battery platform. I am very happy with all of the tools I have purchased on this platform. I also other brands and all require different chargers. But it would be nice to have just one battery fits all. I am also on the 12 volt t Bosch system Love the drills and impact drivers. I believe Milwaukee also has a 12 volt system.
There are a lot of other great tool manufacturers and if you happen to be on a different battery platform great. I have nothing bad to say about any of them.
Now this is just me personally and it has nothing to do with how you do it or what you think. I tend to get engrossed in a project and do not pay any attention to what happens around me. Take sanding for instance. Usually one goes from one grit size to finer grit size and then finer one. I am referencing ROS sander. I prefer hook and loop and in the past I take one disc off and put a finer one on. As I said get engrossed and if I wish to go back to a courser grit, I find that grit that was on my bench has gotten on my disc rendering it impossible to put back on without a lot of tedious labor. So a new sanding disc is put on the sander. For me it is real easy to go through a lot of sanding discs and if you live 17 miles from the nearest stop light you don't just run to the nearest store and get some.
My three main grits are 100, 120 and 150. NOTE: I didn't say I don't go higher at times. And I have found that it is easier to change sanders than to change grits. and it is more cost effective over time because discs tend to get used completely up. I have 4 sanders with the grit written on them.
I my line of work if I work to say plus or minus .015 it doesn't take as long as when I work to plus or minus .001. One can triple the time. and when I have to work to plus or minus .0001 you can add another 3 time as long as it takes to get to .001, not to mention getting it within .001 and then heat sinking it before going to the finish.
What I am saying is one doesn't need a $500 ROS sander to sand with a 100 grit disc. So it is easier, over time to buy in my case 4 sanders.
|

|
|
| Makita Cordless Router |
|
Posted by: Bill Holt - 03-01-2025, 08:22 AM - Forum: Woodworking Power Tools
- Replies (7)
|
 |
I have become spoiled with cordless tools. I started with Makita and have been very happy until...
The router!!! Each time I use it, the collet nut has to be tighter than the last. I replaced the collet, no change.
Makita has a huge service center in Dallas, but it is a very inconvenient drive; plus I'm in a multi-router project. So, I'm hoping the brain trust here has an idea or ????????
|

|
|
| SOLD FS: Delta DP-600 17” Floor Model Drill Press |
|
Posted by: Rick_B - 02-27-2025, 07:44 AM - Forum: Tool Swap N' Sell
- Replies (1)
|
 |
DRILL PRESS IS SOLD
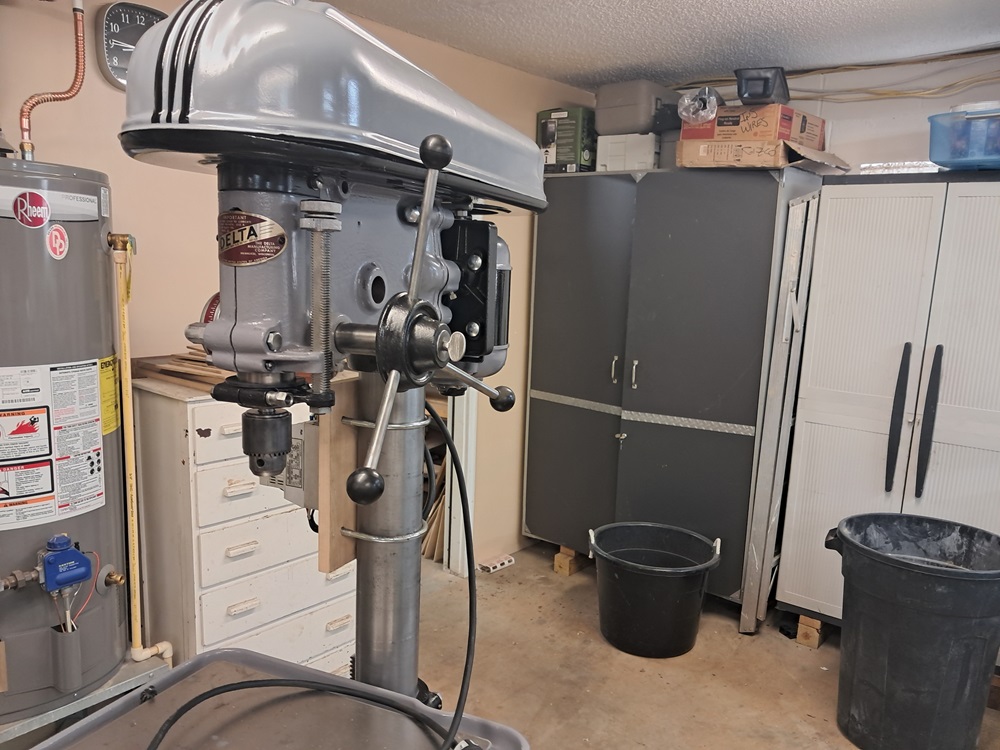
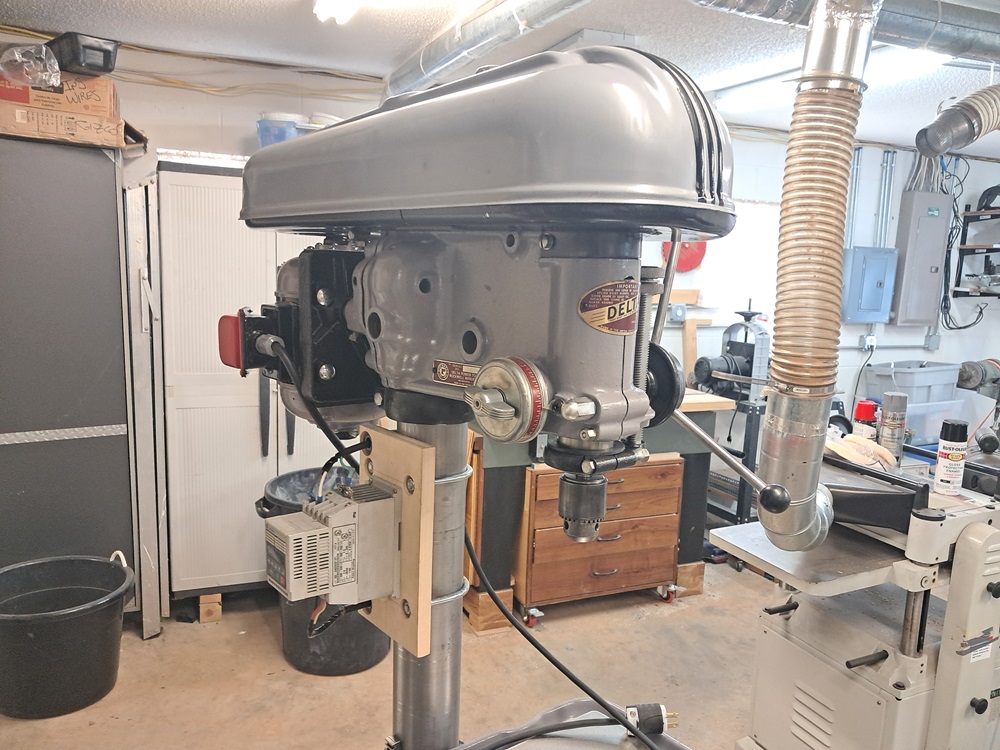
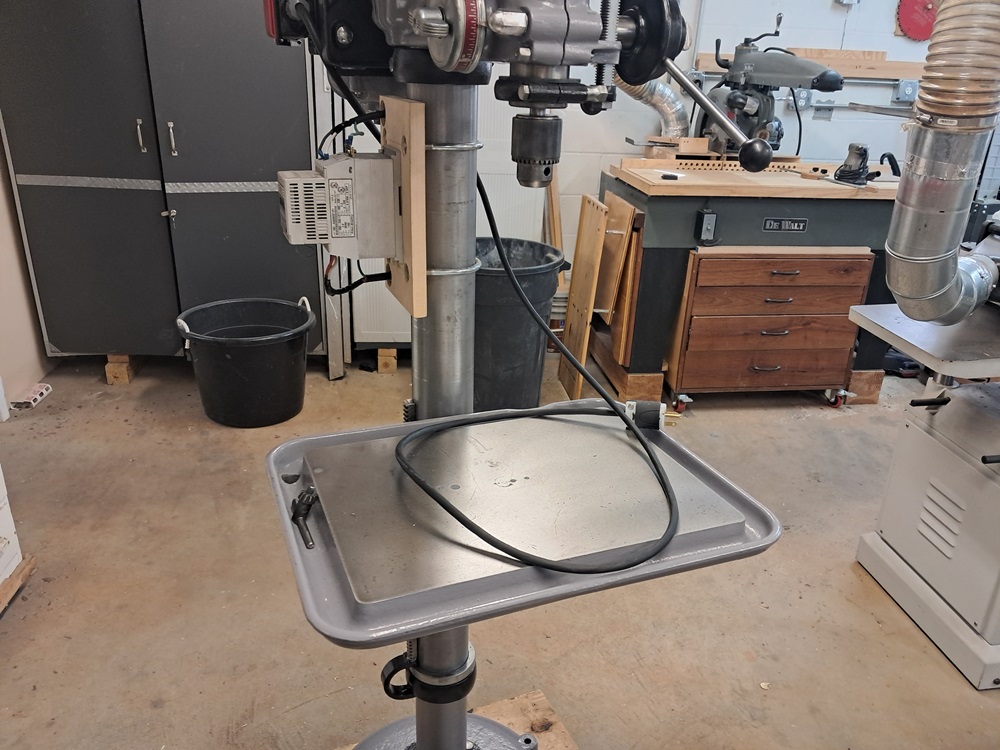
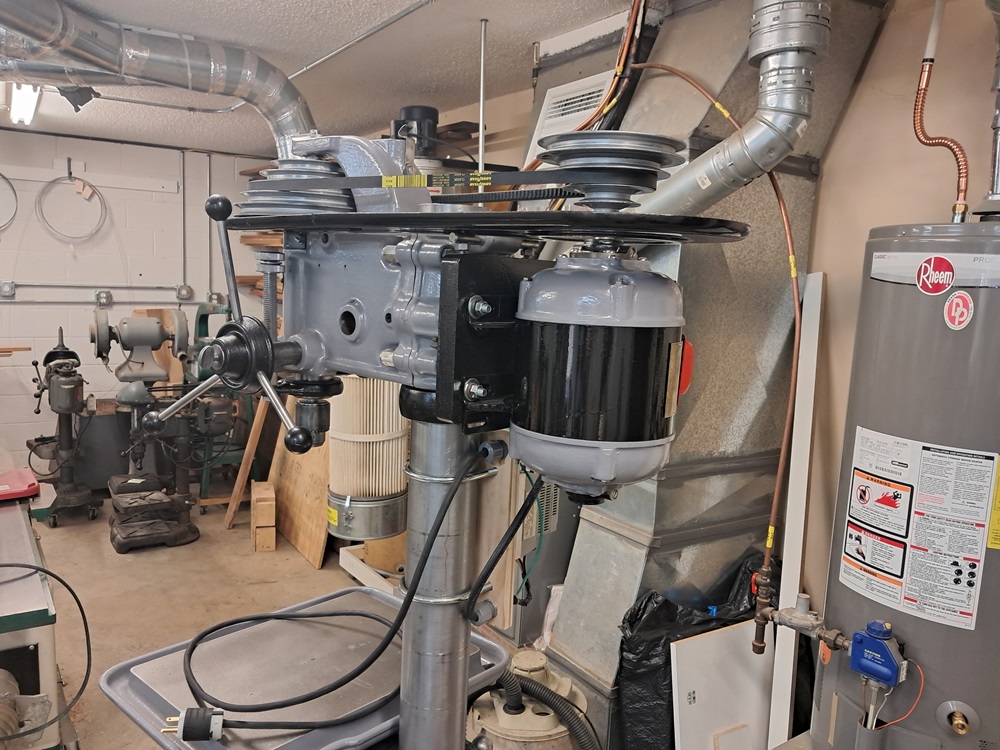
This is a recently completed rebuild – it is a Delta DP-600 17” floor model drill press from the early 1950’s. It came to me with a serial number of 105-1580 which puts it as a 1952 build. It has been completely disassembled, cleaned and painted. The drive system is a Wagner Electric 1/2 HP 3 Phase 1140 RPM 230/460 volt motor. The asking price includes a VFD that requires 220 single phase input. It has low speed 5 step pulleys that generate speeds, measured by optical tachometer, of 1525. 1000, 640, 425, 267. With the VFD you will have theoretically infinite speed ranges but from a practical sense there is a limit. The VFD is currently mounted to the machine – but the new owner should choose their desired mounting configuration. I can demonstrate the drill press running. The VFD programming guide and parameters document is included.
I have replaced the two quill bearings and the two spindle pulley bearings. I also replaced the drive belt. The spindle has a Jacobs Stub Spindle taper nose and a Jacobs 6A 33 chuck is included with a 0 to ½ capacity. Run out measured on the spindle nose is .001”. Also included is the standard Delta depth stop assembly and quill return spring mechanism. Quill stroke is 5”.
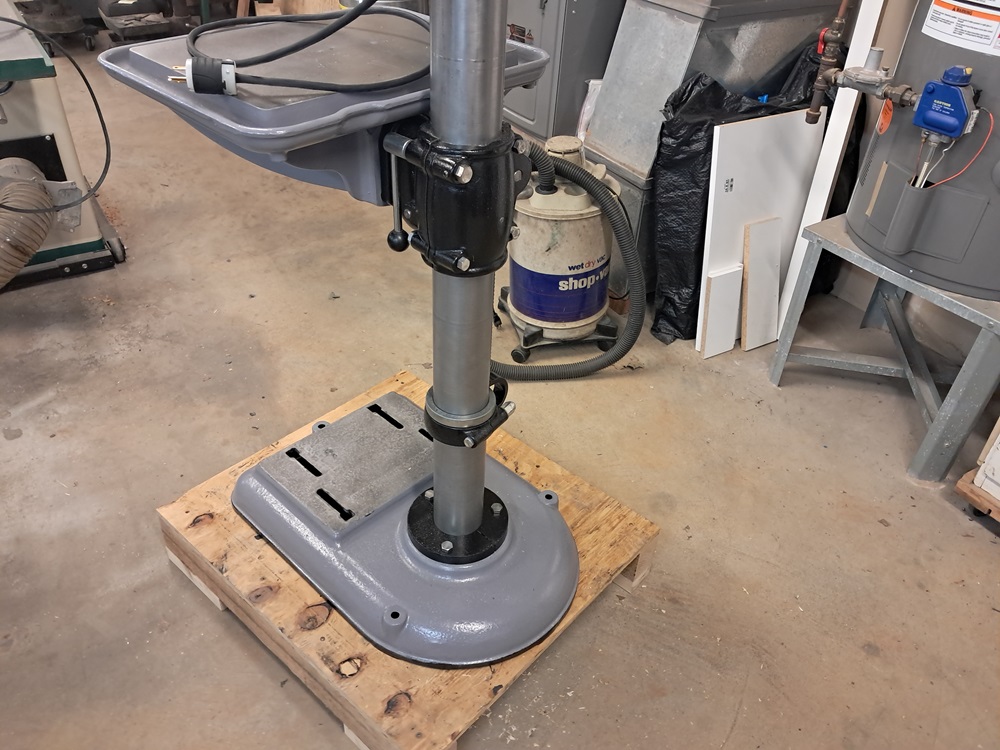
This machine has a table raiser. The production table rotates and tilts – positive tilt stops at 90, -45 and +45 degrees are available. The table can be locked in place at any position between the positive stops. The table has a minor arc of shame but all holes have been filled – they are not invisible but will provide a smooth working surface and will not collect debris. There are table, quill and head locks included.. The base and column are both in good condition. The power cord and plug are also new.
I am looking to get $795 for the drill press – this machine is a step above the run of the mill drill presses available today but is priced competitively with them. More importantly, the asking price is more of a reflection of how much has been invested to bring it back to life. As always, I am willing to entertain offers. To keep things in perspective – take a look at the current prices of imported 17” machines before you walk away. Feel free to ask for more information or pictures. Thanks for looking.
Rick
|

|
|
| Duncan Phyfe: Master Cabinnemaker in New York |
|
Posted by: thunderworks - 02-26-2025, 08:56 PM - Forum: Woodworking
- Replies (1)
|
 |
Anybody interested in a wonderful, new condition book: "Duncan Phyfe: Master Cabinetmaker in New York"?
New condition. I received this as a gift but it's duplicate in my furniture book library. Published by the METROPOLITAN MUSEUM OF ART in 2011. 302 pages. Hardcover.
This catalogue is published in conjunction with the exhibition "Duncan Phyfe:
Master Cabinetmaker in New York", on view in the Metropolitan Museum
of Art, New York, from December 20, 2011, to May 6, 2012 . . .
$20 plus shipping.
rick@thunderworksinc.com
|

|
|
| More Joys of Homeownership |
|
Posted by: jteneyck - 02-26-2025, 11:42 AM - Forum: Home Improvement
- Replies (9)
|
 |
I went down to the basement last evening and found water on the floor. Fortunately, it was not near my shop, rather, the other end in the laundry area where the sump pump is so the water was draining into it. I found the leak in a drain line that dumps into the main stack at that end of the house. It takes water from the kitchen and half bath, and also the sump. As I looked at the pipe, I could see it was corroded through in two places, on the short vertical piece and on the underside of the diagonal piece. Well, OK, I'm not doing anything with it tonight.
![[Image: AP1GczMxoxG3EDvE1TolTMd_AKMLBoSTpxbvR5N3...authuser=1]](https://lh3.googleusercontent.com/pw/AP1GczMxoxG3EDvE1TolTMd_AKMLBoSTpxbvR5N3SIsFQzdcS-Au6EHUcMATFTTB_WIustPvBELjFbjnIiPZkMW6D5Hfbpmq_8m1rBJyf9fLIV0ZH_7ii7eJXR6bhZVvuDadE0ncVjX2LFvgMmoxKhGYA-1oSA=w495-h880-s-no?authuser=1)
Hoping there was still some solid pipe before the 3" T, I went off to the plumbing store and came how with some PVC parts and rubber transitions. The plumbing is above my drier, which would be a real pain to remove, so it was a very inconvenient place to work, of course. I got the pipes cut with a Sawzall and found that the last inch or so of the diagonal piece was still good. Whew. Some measuring and test fitting of parts, and I the repair was done.
![[Image: AP1GczPGGg9tT7Jg_lMEMAQUokCVmGNqufWTfdEc...authuser=1]](https://lh3.googleusercontent.com/pw/AP1GczPGGg9tT7Jg_lMEMAQUokCVmGNqufWTfdEc7hubxArPTnH3D_zP6PTMtzOPuCrQwIAsV7qlEjNGcbbFojIqmZXNLD3_T4Bqcr2sloY1yh9YWh2Rj-rBGZG6UWCaN4snkGJm4VkPaXFVxPJj_UmelDN-tg=w495-h880-s-no?authuser=1)
I am so happy this worked. The work involved had that piece of the diagonal been no good would have been a real bear. Getting enough heat on that big 3" fitting, right next to the wall, would have been a real challenge, one I'd rather not have to attempt. I'm not sure what other alternative I had, though. I don't think there's enough room above the T for a Furnco fitting if I wanted to install a plastic T. I guess maybe I could have put a plug in the stub of the 1-1/2" pipe and installed a new plastic T down below in the straight section of 3" copper. How would you go about it? Just in case.
John
|

|
|
|