| Welcome, Guest |
You have to register before you can post on our site.
|
| Forum Statistics |
» Members: 53,716
» Latest member: MAGHogs
» Forum threads: 68,156
» Forum posts: 1,055,200
Full Statistics
|
|
|
| Minwax Mystey |
|
Posted by: Petertaylor - 07-04-2024, 11:04 AM - Forum: Finishing
- Replies (3)
|
 |
This is not a complaint or a question, just a bafflement.
I made a bed headboard out of very old wood, stuff in my shed, various species. Sanded it down to 160 and sprayed on Minwax Penetrating Seal. The reason a sprayer was used is that headboard design includes a fancy, carved upper front board from an upright piano. That panel has a very rough “patina” texture gained through a hundred years of age.
I didn’t spray it on thickly, just a very light spray, over and over. Here’s the dilemma; the finish never dried! (High humidity in northern Illinois.) Today, using mineral spirits, I rubbed all the sticky finish off. Now I plan to paint it.
|

|
|
| How do I make a wooden blade for a knife? |
|
Posted by: AlanS - 07-04-2024, 10:00 AM - Forum: Woodworking
- Replies (9)
|
|
I want to make a wooden knife for the wife. That means I have to figure out how to put a nice angle on the 'blade' section. How would I taper from 1/8" thick at the top edge to the final thin angle at the cutting edge? Not handle to tip, but the width of the blade. It needs to be consistent and same on both sides of the blade. AND...I have to leave enough without an angle for the layered handle. From the front it's a steep triangle....Anyone think of a jig I could make to assure that both sides of the blade are the same angle?
|
|
|
|
 Thoughts on a Morris Chair refurbishment
 |
|
Posted by: Kmucha16 - 07-01-2024, 03:33 PM - Forum: Woodworking
- Replies (7)
|
|
I was able to pick up this "vintage" morris chair from a neighbor who claimed the repair was out of their skill level. I have some thoughts about how best to make the repair, but I also wanted to see if I could determine it's style, vintage, and possible future worth to help determine the level of effort and how I repair the leg.
I've searched the internet ad nauseum to try to find a similar style but haven't found anything. A couple distinctive details on this particular chair I haven't seen online are 1) the seat and backrest are single removable pieces, i.e., the structure/frame and cushions are integral, not separate like most chairs; and 2) the elevation control is actually cut into the back legs vs having a metal hardware for the support rod to rest within.


A couple questions for the group:
1) Does anyone know this particular style and/or age? I'm guessing it's either a department store version that was mass produced, or a one off homemade version. particularly with the dowel construction of the leg joints.
2) Based on a possibly unknown age, and the difficulty of replacing the front leg without taking the whole chair apart, I'm considering simply drilling through the dowel holes on the front leg, cutting off those dowels from the side piece and driving new dowels in once the leg is attached to the front board. Possibly plugging with a different wood as a design element, or trying to blend it in to be unseen. If I make it a design, I'd also mimic it on the other leg for symmetry. Thoughts?
3) Other advice on fixing the leg joint? I've already cleaned out the broken wood from the dowels.
Thanks
Kevin
|
|
|
|
| Prepping for a new start |
|
Posted by: Derek Cohen - 07-01-2024, 10:04 AM - Forum: Woodworking Hand Tools
- Replies (4)
|
 |
With the chairs done, next on the agenda is an 8-seater dining table. One of the pleasures in being an amateur is that I get to enjoy the time between builds as much as the builds themselves. My question for all is "what do you do between builds, or in preparation for a new build?".
The table top is to be 68-70" long, 40" wide, and 1 1/4" thick (there will be a 1/4" bevel), in Rock Maple. The Rock Maple is to link with the chairs I built. The legs will be 3" cylinders in Jarrah, 30" high, with 3" Jarrah stretchers connecting. Think of this as a contemporary version of the existing 6-seater 250 year-old table we are replacing (which has 5" stretchers and 2 1/2" diameter legs) ...
![[Image: Prep15.jpg]](https://i.postimg.cc/jqQnNrMc/Prep15.jpg)
But this post is not about design. That is for another time. This post is about prepping.
The Jarrah legs come in 3 1/2" posts, in around 80" lengths. They were cut down roughly, at this stage, with a chainsaw ...
![[Image: Prep1.jpg]](https://i.postimg.cc/Kv16gmN3/Prep1.jpg)
There are 4 wide 10' long and 2" thick Rock Maple boards here. They will be cut down and re-sawn when ready to be used.
![[Image: Prep2.jpg]](https://i.postimg.cc/MHTh5wJ4/Prep2.jpg)
I spent most of the past weekend cleaning the workshop. It was covered in dust from the grinding, sanding, scraping, rasping and shaving that dominated my time over the past few months. The jointer-thickness/planer was cleaned, as was the slider, while the bandsaw was stripped, cleaned and a carbide Lenox Woodmaster CT 1" blade set up for resawing. All this wood is damned hard stuff. The dust extractor bins were emptied, and the ceiling filter cleaned.
There is some pleasure in making all good again, especially with a good coffee to sip, and great jazz to listen to on the workshop stereo.
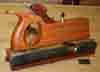
While the machines are important, attention was given to the hand planes I will use. Especially the Veritas #7 Custom Jointer - as good as my Hammer A3-31 jointer is, all edges are finished with a hand plane for invisible joins.
Stripping down the #7, it was clear that it needed a good cleaning.
![[Image: Prep3.jpg]](https://i.postimg.cc/pVcNTmDt/Prep3.jpg)
It's amazing to find this much cr@p under the frog ...
![[Image: Prep4.jpg]](https://i.postimg.cc/D0MRYN2z/Prep4.jpg)
That warranted refreshing the underside of the chipbreaker. You can make out the silver line behind its leading edge ...
![[Image: Prep5.jpg]](https://i.postimg.cc/RZf2XG2M/Prep5.jpg)
The blade was sharpened (30 degrees) and set up with the chipbreaker closed down - the last thing one wants when planing edges is any tearout ...
![[Image: Prep6.jpg]](https://i.postimg.cc/wBpZPLdD/Prep6.jpg)
The chipbreaker received a clean microbevel of 75 degrees. The wooden angle behing provides a guide for freehanding this ...
![[Image: Prep7.jpg]](https://i.postimg.cc/3wFVHNKV/Prep7.jpg)
Re-assembled and looking like new! Incidentally, the frog angle here is 40 degrees (that is about as low as one can go), hence how important it is to set the chipbreaker carefully as it would otherwise be a recipe for disaster.
![[Image: Prep8.jpg]](https://i.postimg.cc/FRFqFvzR/Prep8.jpg)
Testing on a narrow board ...
![[Image: Prep9.jpg]](https://i.postimg.cc/LXyWnWgV/Prep9.jpg)
The even, thin shavings let me know that it is good to go ...
![[Image: Prep10.jpg]](https://i.postimg.cc/PJ9FM84p/Prep10.jpg)
I also took the time to make a side fence for the #7. I've never used one before on this plane, and was curious to find out how accurate (square) it could plane (it leaves a perfect edge). The metal bits come from a Veritas Skew Rabbet Plane ...
![[Image: Prep11.jpg]](https://i.postimg.cc/x8c4HPKV/Prep11.jpg)
And then this was rinse and repeat for a #4 Veritas Custom Smoother ...
![[Image: Prep12.jpg]](https://i.postimg.cc/DfMDhtTv/Prep12.jpg)
.. and a LN #3 ...
![[Image: Prep13.jpg]](https://i.postimg.cc/hPQYtpD9/Prep13.jpg)
That was fun ...
![[Image: Prep14.jpg]](https://i.postimg.cc/Njhz9mFZ/Prep14.jpg)
Regards from Perth
Derek
|
|
|
|
|


![[Image: VeritasSkewRabbetPlaneKnob_html_m4bd4eb4b.jpg]](http://www.inthewoodshop.com/ShopMadeTools/VeritasSkewRabbetPlaneKnob_html_m4bd4eb4b.jpg)
![[Image: VeritasSkewRabbetPlaneKnob_html_2fadae2e.jpg]](http://www.inthewoodshop.com/ShopMadeTools/VeritasSkewRabbetPlaneKnob_html_2fadae2e.jpg)
![[Image: VeritasSkewRabbetPlaneKnob_html_m66fee880.jpg]](http://www.inthewoodshop.com/ShopMadeTools/VeritasSkewRabbetPlaneKnob_html_m66fee880.jpg)
![[Image: VeritasSkewRabbetPlaneKnob_html_m943c015.jpg]](http://www.inthewoodshop.com/ShopMadeTools/VeritasSkewRabbetPlaneKnob_html_m943c015.jpg)
![[Image: VeritasSkewRabbetPlaneKnob_html_38f305e1.jpg]](http://www.inthewoodshop.com/ShopMadeTools/VeritasSkewRabbetPlaneKnob_html_38f305e1.jpg)
![[Image: VeritasSkewRabbetPlaneKnob_html_m1aac6897.jpg]](http://www.inthewoodshop.com/ShopMadeTools/VeritasSkewRabbetPlaneKnob_html_m1aac6897.jpg)
![[Image: VeritasSkewRabbetPlaneKnob_html_m2a979dea.jpg]](http://www.inthewoodshop.com/ShopMadeTools/VeritasSkewRabbetPlaneKnob_html_m2a979dea.jpg)
![[Image: VeritasSkewRabbetPlaneKnob_html_m7d3c5666.jpg]](http://www.inthewoodshop.com/ShopMadeTools/VeritasSkewRabbetPlaneKnob_html_m7d3c5666.jpg)