| Welcome, Guest |
You have to register before you can post on our site.
|
| Forum Statistics |
» Members: 53,724
» Latest member: ATapper
» Forum threads: 68,225
» Forum posts: 1,056,220
Full Statistics
|
|
|
| Cutting tenons quickly and safely |
|
Posted by: Mike Brady - 02-13-2024, 02:02 PM - Forum: Woodworking
- Replies (16)
|
 |
I recently have been making a dressing bench for use at the foot of a bed There are 12 mortise and tenon joints needed. I don't use much machinery in my woodworking, but I do have a table saw and a mortising machine, and a bandsaw. Those tools present several options for making good-fitting M&T joints, but I'll have to admit that I have not established an easily repeatable cutting technique. Could any of you share how you cut M&T joints in table construction?
|

|
|
| Repurposed 1940's Office Table with Benches |
|
Posted by: lscraig - 02-12-2024, 07:51 PM - Forum: Finishing
- Replies (2)
|
 |
My best friend and his wife moved into a new house Fall 2023, and they were using a 1940's office table as a dining room table. The table is mahogany veneer. Most of the lacquer was gone, there were scratches, dents, coffee rings, and some areas of split veneer all over the table top.
He asked if we could make some benches to fit the table instead of chairs. So we go to the lumber yard and get some ash they has on special because it has some beetle holes in it. His wife likes the distressed look, so we get the wormy ash, and I make two benches. Bench construction is corner bolt leg assembly with traditional aprons.
Finish is one coat custom tint dye to approximate the color of the mahogany table after it was refinished. Top coat is 3 coats Target Coatings Emtech 7000 satin conversion varnish.
The table I took back to the shop and stripped off the rest of the lacquer, patched the dents and torn veneer, replaced missing pieces of the edge banding, and sanded it up.
The drawer was missing, so I built a drawer box out of wormy ash scrap. The front is a piece of sapele my buddy had left over from a previous project. I used half blind dovetails for the drawer construction and put in a cedar bottom to make the napkins smell good.
I colored the top with General Finishes Antique Brown them 3 coats of Target Coatings satin conversion varnish. All sprayed with an HVLP with 1.4mm tip. Table refinish was.very satisfying. Because his wife likes the distressed look, I did't take all the scars or defects out. I patched the worst of it and filled in the small stuff with dark brown wood filler. All the scars, blemishes, and mistakes are visible, but we all agree it looks great for a piece of re-used 1940's office furniture.
Photos: https://photos.app.goo.gl/94hVrAQaudjfwtVeA
|

|
|
| refinishing water rings on nightstand Pix added !! |
|
Posted by: Wild Turkey - 02-12-2024, 12:43 PM - Forum: Finishing
- Replies (13)
|
 |
Finally got the image to link A friend has asked for advice about restoring nightstand top. Said it was Cherry and I suggested Formby's from what she said but picture shows serious water rings and it looks more like walnut.
She has considered sanding and refinishing top but I'm wondering how hard it will be to remove the water rings. Are they part of the finish, or are they stained into the wood?
Any help will be appreciated by us both.
https://imgur.com/14zp5BB
|

|
|
| Project for my daughter |
|
Posted by: joe1086 - 02-12-2024, 11:09 AM - Forum: Woodworking
- Replies (13)
|
 |


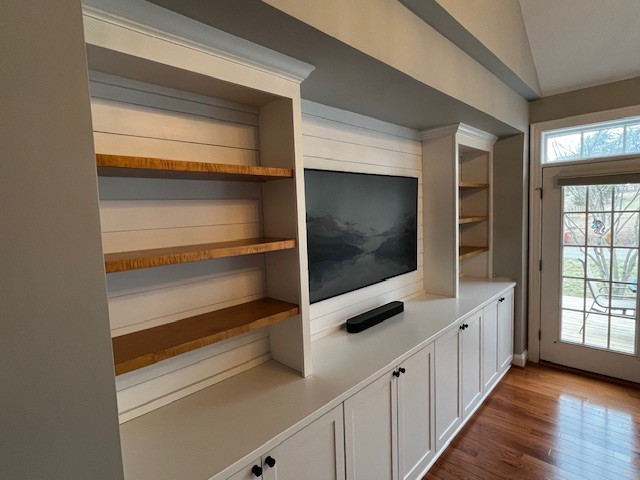
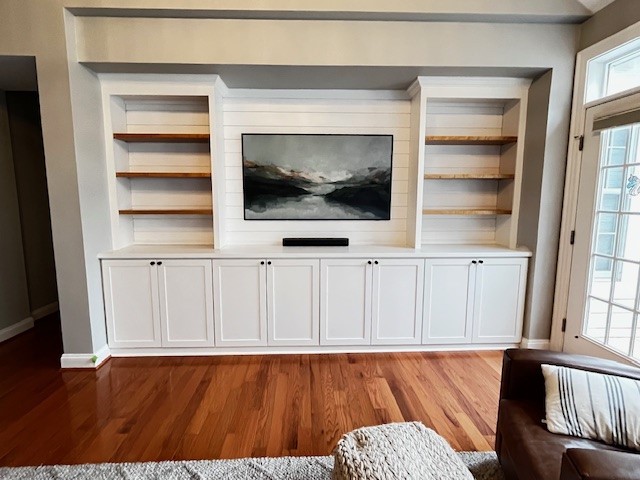
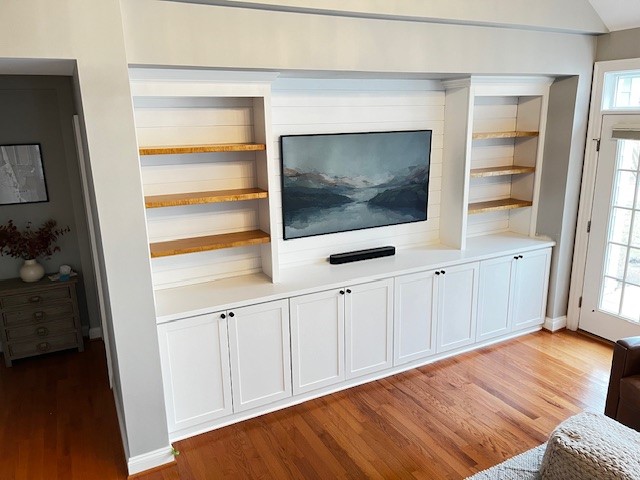
I just finished a project for my daughter’s house in Charlottesville, about a three-hour drive. They have an alcove in their family room, 12’ wide and 8’ tall and 27” deep. Originally, the alcove had a gas fireplace insert in the center, a TV/bookcase on the left, and a storage area on the right.
I started the project in the fall. One of the challenges was that everything needed to be transported in my SUV, which has a maximum 6’ long interior capacity. So everthing had to break down to fit in the car. On one trip, I took the lower cabinet components and countertop; on a second trip, I took the bookcases and moldings. In November, I installed the base and cabinets; on New Year’s weekend, we installed the shiplap; and this past weekend, we finished up with the bookcases. We were able to get the shiplap delivered locally.
All of the face frames and door rails and stiles are maple. They have a couple of kids and a dog, and we wanted material that was more resistant to dings and abuse. The countertop is maple ply. Surprisingly, both the maple hardwood and ply came from Home Depot. I probably paid a bit more by getting it there, but the hardwood was flat and clear, and so was the plywood. They wanted the shelves to be natural and beefy, so I doubled up plywood and edge-glued some maple. A couple of the HD boards had a bit of figure, so we used that on the shelving edges. The four lower cabinet sections are 3’ wide and have a shelf, and I was a bit concerned about sagging over that length. I found some U-channels on Amazon designed for longer shelf spans and applied them to the front and back of each shelf.
Thanks to the forum with finishing suggestions. The cabinets are painted with BM Advance – I brushed it on, after failure trying to spray it. I borrowed an Earlex HVLP but it didn’t have enough grunt to spray the paint without overthinning it. But the Advance paint leveled out beautifully. I used GF High-Performance poly on the shelves.
|

|
|
|