| Welcome, Guest |
You have to register before you can post on our site.
|
| Forum Statistics |
» Members: 53,715
» Latest member: Swig4646
» Forum threads: 68,127
» Forum posts: 1,054,712
Full Statistics
|
|
|
| UofM inlay segment bowl |
|
Posted by: mtrainer90 - 10-08-2024, 09:17 AM - Forum: Woodturning
- Replies (1)
|
 |
This 11.75in by 3in bowl features the University of Michigan block "M" out of American Smoke tree inlayed in the bottom of a piece of Black Walnut, both which were cut on my FoxAlien 4040 XE-PRO CNC router. 3 segmented Black Walnut rings with a Yellowheart rim make up the sides. The bowl is finished with Acrylic Enamel and polished with Ack's Woodpaste
|

|
|
| Mortise Pal |
|
Posted by: ranger29 - 10-08-2024, 12:42 AM - Forum: Tool Swap N' Sell
- Replies (7)
|
 |
For sale is a new mortise jig for making loose (floating) tenon work. The package includes the jig, all mortise templates, and instructions. Although the manufacturer discontinued the jig, it won awards from major woodworking magazines. I purchased this jig approximately 10+ years ago, but never had the opportunity to use it. Original cost $200+.
$50 plus shipping.
|

|
|
| Cement Fiber Butt Joints |
|
Posted by: R Clark - 10-07-2024, 12:28 PM - Forum: Home Improvement
- Replies (11)
|
 |
Our house was built in 2004, with the shop building built in 2005. Both structures are stick framed, and both are sided with cement fiber lap siding. I don't know if this is HardiePlank or another brand. We bought the house in 2014.
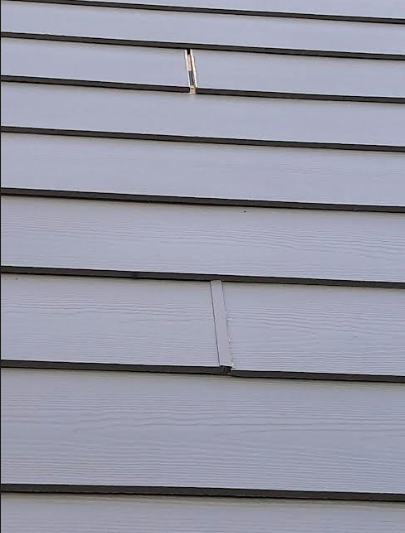
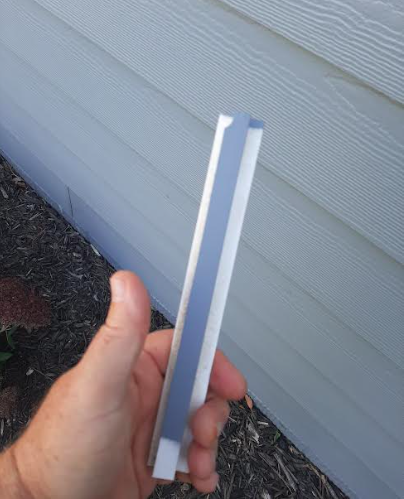
The butt joints on the longer pieces have plastic trim between adjoining pieces of lap siding. Since we moved in ten years ago, some of the plastic trim siding has slipped out of place and I've pushed them back into position. For the first time, one of the pieces has fallen off the house. Here are the pics:
Up near the top of this picture you can see where the trim cap has fallen out of the joint.

This is what fell out:

First: I need to get this plastic cap back in. However, if I just slide it back in, it will slide back out. I think I'm going to put a little dab of acrylic caulk on one side to act as an adhesive to hold it in place. I don't know what else to do; if anybody has any thoughts, I'm willing to listen.
In researching these plastic trim pieces in the butt joints, I think I'm coming to the conclusion that they were NOT intended to be used on cement fiber siding. James Hardie's install instructions say to butt the adjoining pieces together with NO gap over a small piece of metal flashing directly that is installed behind each joint. Those instructions say nothing about using plastic joint trim in the manner I see on my house.
Further, as far as I can tell from my searches, cement fiber planks do not expand and contract significantly like vinyl or wood. The installation gap as seen in the picture above appears to point to an incorrect installation. I don't think the situation is "fixable", short of residing the house. All of the lap siding has these gaps at the butt joints. Caulking all of these joints would result in the siding looking like (excrement).
I have not had issues with water intrusion and the house is wrapped with Tyvek under the siding.
Any inputs on the way ahead are also welcome. Am I as "stuck" in this situation as I think I am?
|

|
|
| Laser level?? |
|
Posted by: goaliedad - 10-07-2024, 11:27 AM - Forum: Home Improvement
- Replies (31)
|
 |
I will be needing a laser lever an upcoming project, maybe two.
Not looking to mortgage my house, but I realize you get what you pay for.
What is a good, lower priced unit? Indoor use, 50 feet or less.
|

|
|
| Dewalt DW735 Planer knives and cutterhead |
|
Posted by: Paladin - 10-06-2024, 10:57 PM - Forum: Tool Swap N' Sell
- Replies (9)
|
 |
I just bought a brand new DeWalt DW735 planer. I also bought a helical head to put in so I could take out the three knife cutterhead.
I did that today and now I have a brand new, never used DW735 cutterhead and 3 unused blades. If anyone wants the cutterhead and blades
I will give them to you if you cover shipping.
|

|
|
| Shepherd infill kit |
|
Posted by: Eazyduzzit - 10-06-2024, 04:36 PM - Forum: Tool Swap N' Sell
- No Replies
|
 |
A decade or so ago I bought 3 Shepherd infill kits. I finished 2 of them and started work on the third, but we started having grandkids and life kind of got in the way. The one I have left is an infill smoother. I’ve already peened the body together, but that’s as far as I got. I have all the parts and the instructions and I was wondering if anyone here is interested in building one. They are fun to build and they work great, but seeing as I started it over 10 years ago, I don’t see myself finishing it.
THIS HAS SOLD. I THOUGHT I HAD DELETED IT, BUT APPARENTLY I DON’T KNOW HOW
|

|
|
|